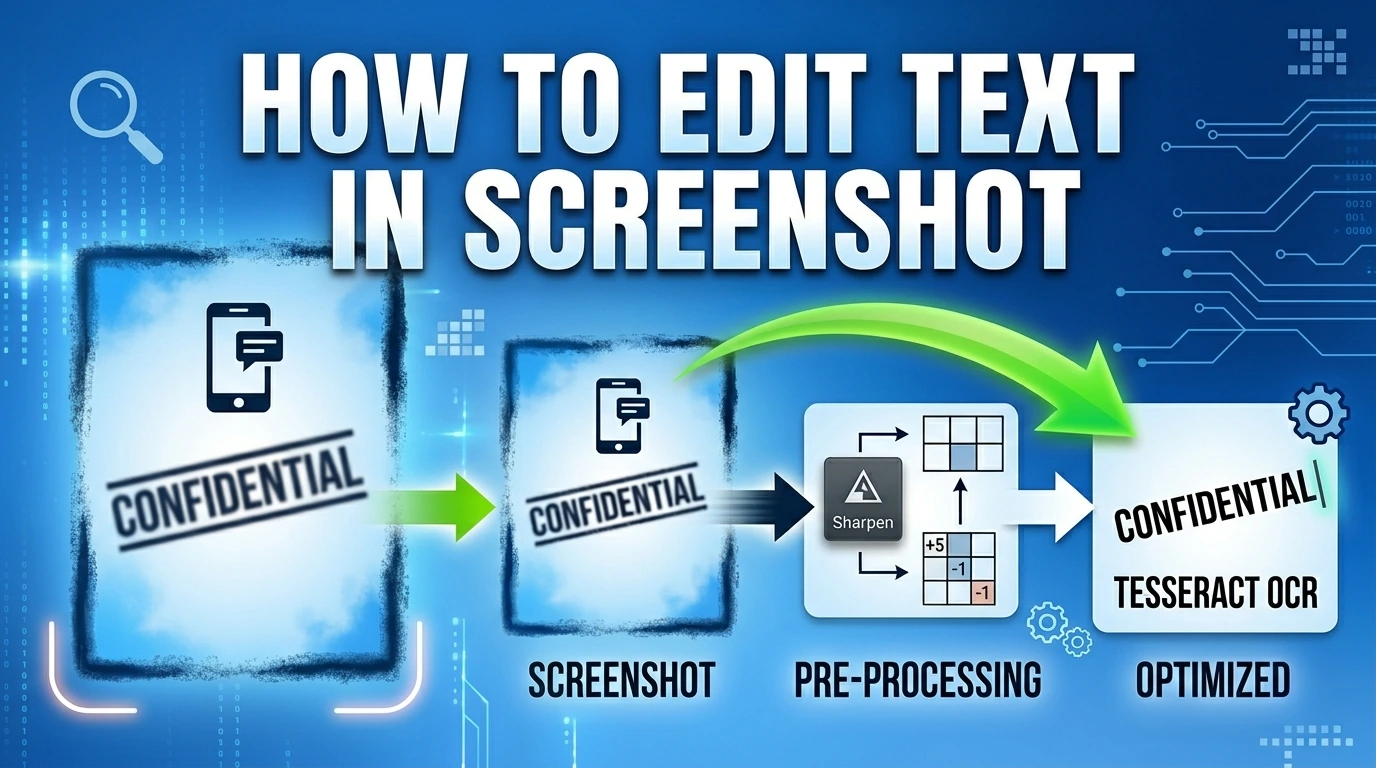
How to Edit Text in a Screenshot
So how to do it, If you’re going the manual route, you open your screenshot in an image editor Photoshop, GIMP, or even MS Paint use the eyedropper to grab the background color, paint over the old text with a brush or a filled rectangle, then add a new text box, trying to match the font, size, and color by eye. It works, but it takes patience, and unless you’ve got a designer’s touch, the result often looks like you slapped a white rectangle over the original.
The smarter way is to let a browser‑based OCR tool like the Screenshot text editor do the heavy lifting. You upload the screenshot, click “detect text,” and it finds every word. When you click the one you want to change, the tool automatically samples the background color, covers the old text, and drops a new editable text box in place guessing the font size, spacing, and even whether it’s bold or italic. You just type what you need, tweak a setting if you want, and download. No design skills required, and for clean screenshots, the edit is nearly invisible.
Table of Contents
Why Editing Text in a Screenshot Is Trickier Than It Looks
When you take a screenshot, the resulting image is essentially a flat photograph of pixels. Unlike a Word document or a PDF with an editable text layer, a screenshot has no concept of “text” every letter, every space, every comma is just a collection of colored dots arranged to look like characters.
This means traditional editing software can’t simply click on the text and retype it. To change what a screenshot says, you need to either paint over it and add new text on top or use Optical Character Recognition (OCR) a technology that analyzes the pattern of pixels and figures out what characters they represent.
A screenshot is just pixels. Good screenshot editors solve two problems simultaneously: reading what’s there (OCR) and replacing it convincingly (font matching + color extraction).
Most people’s first instinct is to open Photoshop or MS Paint, smear a rectangle over the original text, and type new text on top. The problem? The replacement text almost never matches the original different font, different size, different color, wrong position. The result looks obviously edited and unprofessional.
The good news: modern browser-based tools have become remarkably capable. Let’s look at how they actually work under the hood
How OCR Reads Your Screenshot
OCR has been around since the 1970s, but modern neural-network-based approaches have transformed accuracy dramatically. Today’s best tools including the engine used in Screenshot editor Pro can handle blurry images, mixed fonts, angled text, and even handwriting.
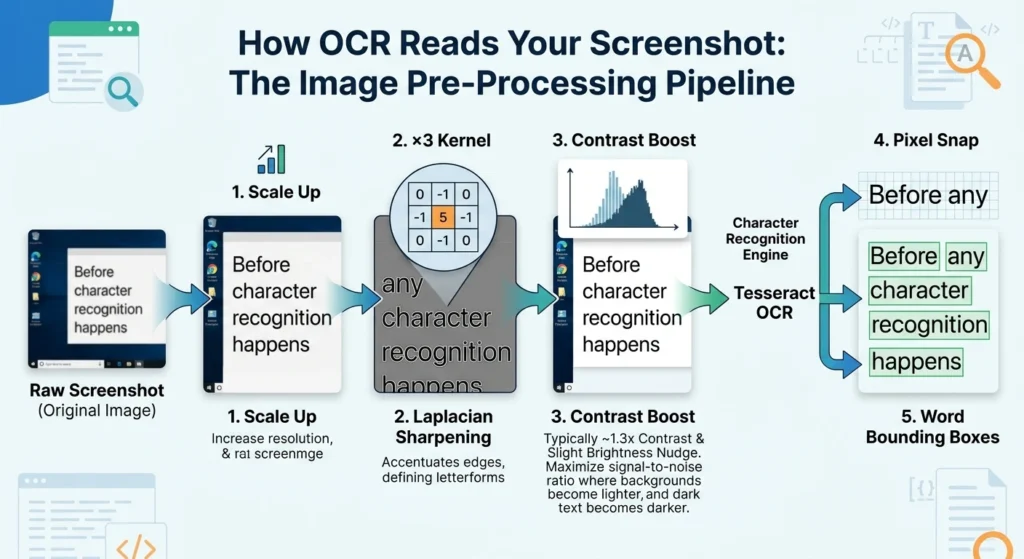
The Image Pre-Processing Pipeline
Before any character recognition happens, the image needs to be optimized. Raw screenshots often have compression artifacts, inconsistent contrast, and subtle noise that confuses recognition algorithms. A well-designed tool runs the image through several enhancement stages first:
Raw Screenshot → Scale Up → Laplacian Sharpening → Contrast Boost →Tesseract OCR →Pixel Snap → Word Bounding Boxes
The sharpening step uses what’s called a Laplacian kernel a 3×3 grid of weights applied to every pixel that accentuates edges (the transitions between dark and light that define letterforms). The kernel looks like this: [0, -1, 0, -1, 5, -1, 0, -1, 0]. The center weight of 5 amplifies the current pixel while the surrounding −1 weights subtract neighboring values, making sharp edges even sharper.
After sharpening, the image gets a contrast enhancement pass typically around 1.3× contrast with a slight brightness nudge. This pushes light backgrounds lighter and dark text darker, maximizing the signal-to-noise ratio for the character recognition engine.
Pixel Snapping: The Secret to Tight Bounding Boxes
OCR engines output approximate bounding boxes rectangles that roughly surround each detected word. These estimates are often slightly too large or misaligned. Screenshot Pro’s Neural Snapping algorithm then scans the actual pixel data within and around each bounding box to find where the ink really starts and ends, producing a much tighter fit that makes text replacement far more accurate.
Any pixel darker than a brightness threshold of 175 (on a 0–255 scale) is treated as ink. The algorithm walks inward from each edge of the search area, finding the true minimum and maximum x and y coordinates of ink pixels, then adds just 1 pixel of padding to ensure anti-aliased edges are fully covered.
Note: Words with a Tesseract confidence score below 25% are automatically discarded. This prevents garbage characters from cluttering your OCR results. You can click any detected word in the results panel to highlight its exact location on the image.
Step-by-Step: Editing Text with ScreenShot Text Editor
Here’s a complete walkthrough from uploading your screenshot to exporting the finished result in the tool. The entire process runs in your browser nothing is uploaded to any server.
1. Upload Your Screenshot
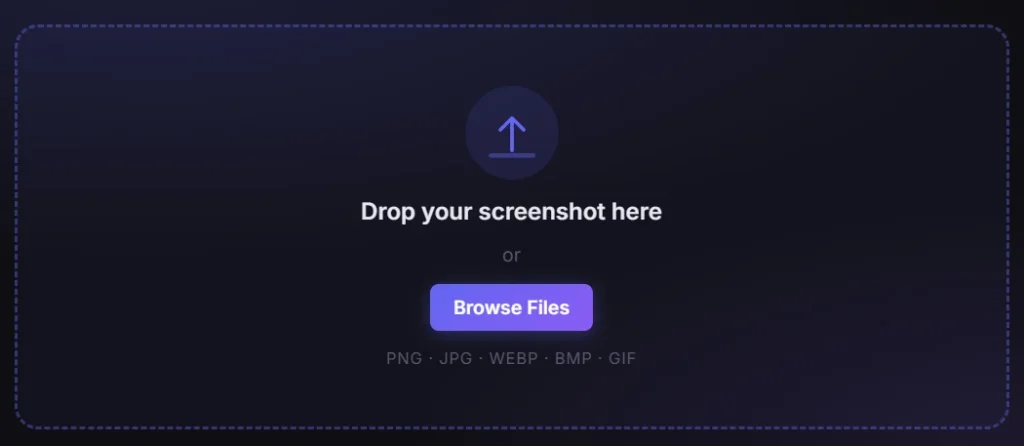
Drag and drop your image onto the upload zone, click to browse your files, or paste directly from your clipboard with Ctrl+V. Supported formats include PNG, JPG, WebP, and GIF. The editor automatically scales large images to fit your screen while preserving the original resolution for export.
2. Run Neural Vision (OCR Scan)
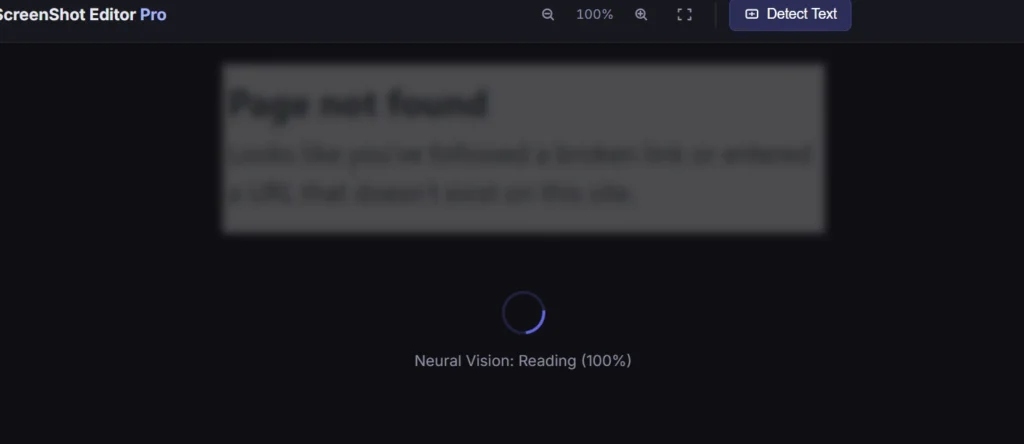
Click the text detection button in the left toolbar. The engine scales your image to 2× resolution, applies the sharpening and contrast pipeline, then runs Tesseract to detect all text. This typically takes 5–15 seconds depending on image complexity. A real-time progress percentage shows in the loading overlay.
3. Click a Word to Select It
Once scanning completes, all detected words appear in the right panel. Click any word in the list or click directly on it in the canvas to highlight its bounding box in purple. A tooltip appears with two options: Edit Text or Cover Region.
4. Choose “Edit Text” to Replace the Word
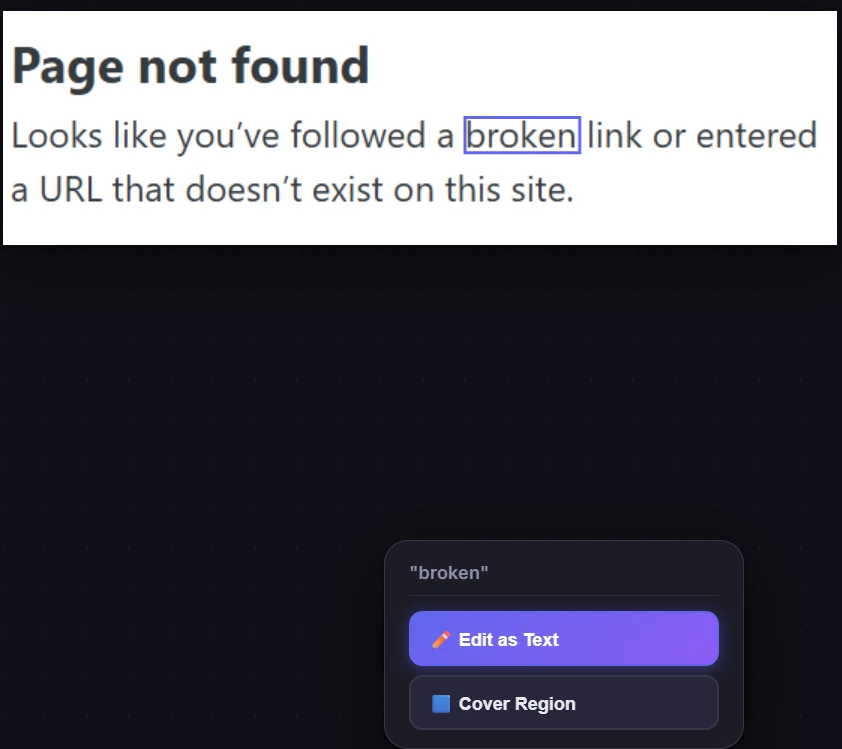
Selecting Edit Text automatically covers the original word with a background-colored rectangle, then places a new editable text object on top with matched font size, detected color, and estimated style. The text cursor appears inside the new object just start typing your replacement text immediately.
5. Fine-Tune in the Properties Panel
Use the right panel to adjust font family, size, weight (bold/italic/underline), text color, and background color. On mobile, a quick-access bar appears at the bottom of the screen when a text object is selected, giving one-tap access to the most common properties.
6. Export at Full Resolution
Press Ctrl+S or click the download button in the right panel. The export system calculates a multiplier to restore your image to its original pixel dimensions so even though the canvas may appear scaled down on screen, the exported file is full resolution. Choose PNG for lossless quality or JPEG with a custom quality slider.
Matching Fonts, Colors, and Sizing Automatically
The most technically impressive part of the editing workflow is how the tool attempts to make replacement text visually indistinguishable from the original. This involves three separate analysis systems working together.
Color Extraction
When you select a word to edit, the tool samples pixel colors from both inside and around the bounding box. It uses two separate algorithms for background and foreground colors:
For the background color, it analyzes the pixels along the border of the sampling region (the outermost few pixels). These are most likely to be pure background rather than text. It then uses a mode-finding algorithm that groups similar colors into bins of ±4 RGB units accounting for JPEG compression artifacts that slightly vary pixel colors and finds the most common bin. The result is the dominant background color.
For the text/foreground color, it takes all the sampled pixels, measures each one’s “distance” from the background color using Manhattan distance (sum of absolute RGB differences), sorts them from most-different to least-different, and takes the most common color among the top 15%. This isolates the color of the ink without being confused by background pixels.
JPEG Compression Note: Heavy JPEG compression introduces color banding and artifacts around text edges. For best color extraction results, use PNG screenshots when possible, or crop tightly around the text region you want to edit before scanning.
Font Size Estimation
Matching font size is more nuanced than it might seem. The bounding box height from OCR doesn’t directly equal font size it measures the total ink height including ascenders (the tall parts of letters like ‘h’, ‘l’, ‘b’) and descenders (the dangling parts of ‘g’, ‘y’, ‘p’). Different character sets occupy different portions of the full em square.
The tool analyzes which characters appear in the detected word and estimates the appropriate ink-height ratio. For words containing capitals or tall ascenders, it uses a ratio of about 0.05 to 0.75 of the em square. For words with only short lowercase letters (like ‘a’, ‘c’, ‘e’), it uses roughly 0.25 to 0.75. Then it back-calculates the font size needed for that ink ratio to produce the measured bounding box height.
Font Family Detection
Full font matching is a hard problem, but the tool handles the most common cases well. It checks Tesseract’s font name metadata field first when present, this can identify the specific family. If absent, it falls back to a pixel-analysis heuristic: it checks the density of dark pixels at the very top and bottom edges of the character region (where serifs appear as horizontal strokes). High edge density suggests a serif font like Times New Roman; low density points to a sans-serif like Arial.
| Detection Method | When Used | Accuracy |
|---|---|---|
Tesseract font_name metadata | Always attempted first | High |
| Serif edge-density heuristic | Fallback when metadata absent | Medium |
| Darkness/pixel-density for bold | When is_bold missing | Medium |
| Skew analysis for italic | When is_italic missing | Lower (threshold: 2.8) |
Character Spacing and Width Matching
Once the text object is placed, the tool measures its rendered width and compares it to the target bounding box width. It first adjusts charSpacing (tracking) within a safe range of −30 to +100 milliems beyond this range, characters would overlap or spread too far apart. If the width still doesn’t match after kerning adjustments, it applies a horizontal scale (scaleX) to stretch or compress the text to fit exactly, which mirrors how browser layout engines handle text fitting in constrained spaces.
More Techniques: Blur, Mosaic & Covering Text
Sometimes you don’t want to replace text you want to hide it entirely. Screenshot Pro offers three privacy-preserving tools, each with different visual results and appropriate use cases.
Gaussian Blur: Renders the selected region through a canvas blur filter applied multiple times for intensity. Best for hiding sensitive data in a natural-looking way. The blurred region is baked into a new image layer you can reposition or resize.
Mosaic / Pixelate: Down-scales the region to about 1/10th its size then up-scales it back with nearest-neighbor interpolation (no smoothing), creating a tile effect. Tile size adapts to the selection area automatically.
Solid Cover: Places a filled rectangle over the selected OCR region using your current fill color. The fastest method ideal when you want a clean redaction box rather than an obscured region. Triggered via the “Cover” button on any OCR word.
Manual Draw: Use the pen or highlight tool to hand-draw over text. The highlighter uses 40% opacity so you can see through it, useful for annotation rather than redaction. Pen strokes are vector paths scalable and selectable.
Using the Blur Tool
Select the Blur tool (B key), then click and drag a rectangle over the area you want to obscure. On mouse release, the tool captures the current canvas as a temporary image, passes it through the canvas filter: blur() API three times for intensity, and places the result as a new raster image object exactly where you drew. You can then move or resize this blurred region using the selection tool.
Using the Cover Button from OCR Results
Instead of drawing manually, click any detected word in the OCR results panel, then click the Cover button. The tool automatically calculates the bounding box of that word (with 4 pixels of padding) and places a filled rectangle over it using your current fill color. This is the fastest way to redact sensitive words like names, phone numbers, or account numbers that the OCR engine has already precisely located for you.
Keyboard Shortcuts to Speed Up Your Workflow
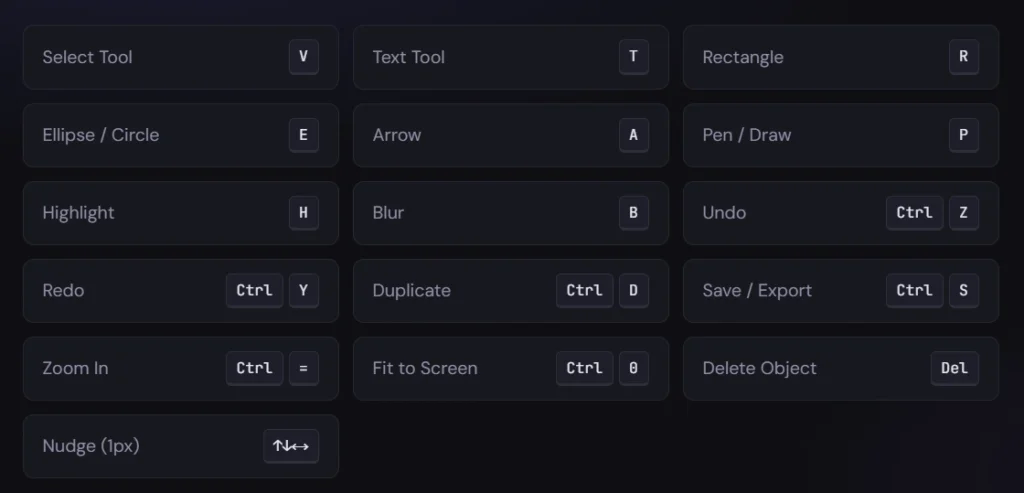
Arrow keys move the selected object by 1 pixel at a time. Hold Shift while pressing an arrow key to move by 10 pixels useful for coarse positioning without touching the mouse. These shortcuts are suppressed when a text object is in active editing mode, so you can type freely.
Pro Tips for Accurate Results
Use PNG Screenshots When Possible
JPEG compression introduces color noise around text edges that can confuse both color extraction and OCR. If you’re taking a fresh screenshot (rather than editing an existing file), save or copy it as PNG. The difference in OCR accuracy and color matching quality is noticeable, especially with small fonts.
Crop Before Scanning Dense Images
Running OCR on a full-screen screenshot with dozens of UI elements can be slow and produce hundreds of detected words. If you only need to edit one section, use the Crop tool first to isolate just that area, then run the Neural Vision scan. This speeds up detection significantly and keeps your OCR results list manageable.
Sample Background Color with the Eyedropper First
Before using the Cover feature, activate the Eyedropper tool and click on the background color adjacent to the text you want to hide. This sets your fill color to an exact match. Then Cover will blend seamlessly much more convincing than guessing at a hex code.
Use the Layers Panel to Stay Organized
Every text box, shape, and blur region you add appears as a separate entry in the Layers panel on the right. Click any layer to select it, use the up/down arrows to change stacking order, and duplicate layers when you need similar elements. The layer panel also lets you identify and delete objects that got hidden underneath others.
Export at 2× or 3× for Retina/HiDPI Displays
The export panel includes a scale selector. If your screenshot will be viewed on retina displays or printed, select 2× or 3×. The export engine multiplies the canvas resolution, accordingly, combined with a factor that restores the original image resolution so your output can actually exceed the original file’s pixel count when annotations need to stay crisp.
This Tool Isn’t Perfect Yet
Here’s where you’ll run into trouble.
OCR misreads certain fonts: If the original screenshot uses a stylized font think script, handwriting, or something with weird spacing the OCR might spit out nonsense. I’ve seen “Welcome” come back as “We1c0me.” When that happens, the bounding box is also off, and the replacement text won’t line up right.
Font matching is a best guess: The tool tries to detect if it’s serif or sans‑serif, but it won’t identify “Helvetica Neue” vs “Arial.” Most of the time the default fallback looks close enough. But if you’re working with a distinctive brand font, you’ll need to manually pick something similar from the dropdown.
Background color sampling fails on gradients: If your text sits on a background that isn’t a solid color like a gradient or a photo the sampled background might be a mix of colors. The replacement rectangle can look like a patch. The workaround? Use the blur or mosaic tool instead of a solid cover or carefully mask around each letter (which is tedious).
Bounding boxes can be slightly off: The “pixel snapping” is good, but not flawless. Sometimes the detected word includes a stray pixel from a nearby letter, making the replacement box extend too far. You can manually adjust the rectangle after the fact, but it takes an extra step.
It works best with clean screenshots: Heavy JPEG compression, low resolution, or small text (below 10px) all degrade the OCR and color matching. If your screenshot is a grainy phone pic of a monitor, don’t expect perfection.
The tool is constantly being updated. The developers tweak the neural vision pipeline, improve sharpening algorithms, and refine font detection with every release. What’s a little rough today will likely be smoother in a few months.
So go into it with realistic expectations. Use it for what it’s good at: quick edits on clean screenshots, redacting sensitive info, and fixing typos. For complex work like replacing text on a product box with a gradient background, you might still need a pro tool or a patient hand.
Bottom Line
Browser‑based screenshot editors like the one I’ve walked you through are a genuine game changer if you go in with your eyes open. You can fix a typo, redact a phone number, or swap out a word in a screenshot without ever opening Photoshop. No design skills required.
But it’s not a magic wand. OCR will stumble on funky fonts, and the background matching may fail on gradients. Bounding boxes sometimes need manual nudging and if your original screenshot is a low‑quality JPEG with tiny text, the results will be rough.
The tool is still in active development, every few months the detection gets a little sharper, the font matching a little smarter. For now, treat it as a very capable assistant not a flawless one.
Use it for the 90% of everyday screenshots, clean UI grabs, receipts, social media posts, or anything where the text sits on a solid background. It’ll save you time and frustration. For the tricky 10% complex backgrounds, artistic fonts, or critical design work you’ll still need patience or a pro tool.
But for most people, most of the time? This gets the job done and that’s more than we could say a couple years ago.